


Thank you for your purchase. Please read all instructions before beginning your installation.
- Standard Pleated Shade Installation
- Deluxe Pleated Corded Installation
- Deluxe Pleated Cordless Installation
Standard Installation Instructions
Tools you will need
- Screwdriver
- Measuring tape and pencil
- Drill and drill bit
- Step ladder
Mounting Hardware Kit Includes
- Mounting Bracket 2 for shades up to 18" to 36 7/8" wide 3 for shades from 37" - 47 7/8" wide 4 for shades from 48" - 72" wide
- 1-1/8" Screws 2 per bracket
- Handle for Bottom Rail 1 for shades up to 59 7/8" wide 2 for shades up to 60" to 72" wide
- Handle for Middle Rail (TDBU only) 1 for shades up to 59 7/8" wide 2 for shades up to 60" to 72" wide
Step 1. Bracket Location and Installation
Your shade may be installed either inside the window frame or outside the window frame.
A mounting bracket should be positioned about 1" to 6" from each end of the head rail. For wider shades that require 3 or more brackets, these should be spaced evenly between the two outermost brackets. Always position the brackets such that there is no interference with the cords and mechanisms inside the head rail. The procedure outlined below will assure proper bracket placement.
Attaching the brackets:
The shape of head rails and mounting brackets varies slightly by size and style of shade.


For style 'A' [see illustrations]: Lift the head rail into position such that the inner front edge of the head rail slides into the slot at the front of each bracket. Push the head rail upward until the flexible tab at the bottom of each bracket snaps onto the back of the head rail. Check carefully to assure that each bracket is properly secured.
For style 'B' [see illustration]: Lift the Head Rail into position such that the front edge of the bracket is under the inner front edge of the head rail, and then push the head rail upward until the flexible tab at the bottom of each bracket snaps onto the back of the head rail. Check carefully to assure that each bracket is properly secured.
For Outside Mounting:
Clip the brackets onto the head rail as described above. Hold the shade level at the height desired and center it over the window opening. Mark the exact location of each bracket with a pencil. Remove the brackets from the head rail and position the top of each bracket at the marked location and screw each bracket into the wall or window molding using the 11/8" screws, pre-drill the screw holes using a 3/32" drill bit.
For Inside Mounting:
Clip the brackets onto the head rail as described above. Hold the shade in place and make a pencil mark at the rear of each bracket where it contacts the inside of the window frame. Remove the brackets from the head rail and align them with the marks. Attach each bracket using the 11/8" screws, pre-drill the screw holes using a 3/32" drill bit.

Step 2. Attach Handle(s)
Attach the Handle to the bottom rail as illustrated. The handle is designed to minimize contact with the shade fabric. Always raise and lower the shade SLOWLY(!) to assure that the pleated fabric stacks neatly.
Wider shades have (2) Handles — to precisely determine the correct position for each handle, divide the total width of the shade by 4, and then attach one handle that distance from each outside edge of the shade — always grasp both handles when lifting and lowering the shade.
For Top-Down Bottom-Up shades, attach the 2nd handle to the Middle Rail as illustrated.

Step 3. How to Operate
- Make sure that the Handles have been attached to the rail(s) as described above (see Step 2)
- To maintain optimal performance of the springs that make your cordless shade function, lift and lower your shade through its full range of motion - all the way up and down - every day if possible.
- For shades with a single handle, which must be centered on the rail(s), lift or lower the shade slowly and evenly, keeping the rail(s) level, until the shade is positioned as desired.
- For wider shades with a double set of handles, grasp the handles using both hands and lift the shade slowly and evenly, being sure to keep the rail(s) level.
- If you have trouble lifting your cordless shade: If the shade is left in one position for a long period of time, it might be necessary to lift and lower the shade several times to restore normal function.
- If the shade has been fully raised for a long period of time, it might tend to spring-back (rebound) slightly from the desired length position. This can also be remedied by lifting and lowering the shade several times.
Standard Shade
Always raise and lower the shade SLOWLY(!) to assure that the pleated fabric stacks neatly. To lower the shade: grip the bottom rail handle and slowly pull straight down. To raise the shade, grip the bottom rail handle and push up slowly. Always keep the bottom rail level.
Top-Down Bottom-Up Cordless Shades
To raise and lower the shade from the bottom, follow the directions above.
To lower and raise the shade from the top: grip the middle rail handle and slowly pull straight down/up.
CLEANING
The vinyl head rail and bottom rail can be wiped clean with a damp sponge. To clean the shade fabric, use a feather duster or vacuum lightly using the soft brush attachment.
Deluxe Pleated Corded Installation
Tools you will need
- Pencil
- Measuring Tape
- Drill
- Screwdriver
- Pliers
- Appropriate fasteners
Step 1. Mark the Bracket Locations
Position the first two installation brackets so that they are approximately 2" in from the end of the headrail. If a third bracket is included, center it between the outer brackets. Wide shades may include up to 8 brackets. In these cases, space the additional brackets evenly, not more than 25" apart. Mark the brackets for mounting hole locations, making sure they are square and equally spaced. For outside mount installations, use a level to check for levelness.

Step 2. Bracket Installation
For Outside Mount Installations
Screw brackets into wall as shown.

For Inside Mount Installations
Screw brackets in window frame as shown.

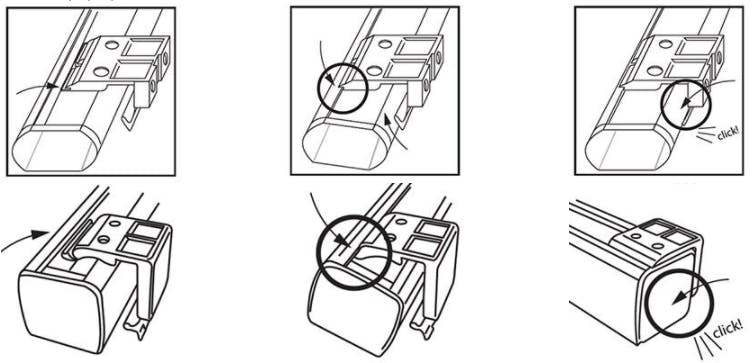
Step 3. Shade Installation
Hang the shade so that the front groove of the headrail is inserted into the front ridge of the bracket. Rotate the shade back toward the glass so that the headrail snaps into place. Make sure that the shade is locked in place.


Operating Instructions:
To lower the shade, pull the cord down and towards the center of the shade to unlock the cord. Then, slowly release the cord until the shade reaches the desired location. Move the cord past the outer edge of the shade and let go to lock the cord.
To raise the shade, pull the cord straight down until the shade reaches the desired location. Move the cord past the outer edge of the shade and let go to lock the cord.
Deluxe Cordless Installation Instructions
Tools you will need
- Pencil
- Tape Measure
- Drill
- Screwdriver
- Pliers
- Appropriate fasteners
Step 1. Mark the Bracket Locations
Position the first two installation brackets so that they are approximately 2" in from the end of the headrail. If a third bracket is included, center it between the outer brackets. Wide shades may include up to 8 brackets. In these cases, space the additional brackets evenly, not more than 25" apart. Mark the brackets for mounting hole locations, making sure they are square and equally spaced. For outside mount installations, use a level to check for levelness.

Step 2. Bracket Installation
For Outside Mount Installations
Screw brackets into wall as shown.

For Inside Mount Installations
Screw brackets in window frame as shown.

Step 3. Shade Installation
Hang the shade so that the front groove of the headrail is inserted into the front ridge of the bracket. Rotate the shade back toward the glass so that the headrail snaps into place. Make sure that the shade is locked in place.

Operating Instructions:
- Shades with Cord Loop Clutch To lower the shade, pull the back cord straight down until the shade reaches the desired location and then release. To raise the shade, pull the front cord straight down until the shade reaches the desired location and then release.
- Cordless Shade To lower or raise the shade, grasp the handle attached to the bottom rail and adjust the shade up or down until the shade reaches the desired location and then release.